I had the week off so I decided to throw together some of the parts I had lying about to make into a fileserver. Based on an eMachines T2080 sporting an AMD 2000+ XP (Model 6) CPU and ECS L7VMM mainboard; 512MB DDR (PC2100); 75GB HDD; DVD-ROM & CD-RW drives. The case and power supply are a joke. I replaced the 250w PS with a 300w Antec PP303X I had in another system. The case has no system fan, and no place to mount one. This posed a problem when I added a second drive to build the RAID1 [Mirroring] device for the fileserver data--heat.
 The only place to secure a second drive in the case is right next to the first (unless I could scrounge up some mounting rails and put it in one of the optical drive slots). This was not going to work. The heat coming off of these two drives was bad. Until I can find a suitable replacement case, I rigged a fan to blow air in the gap between the two drives. It seems to be working well, but it's definitely an ugly hack especially since I have to leave the cover off. The drives however went from blazing hot to barely warm. The sensors command was returning some way out voltages so I quickly swapped out the PS with the Antec. It's still showing high on the 3.3v rail but it might be something in the config, I don't know yet. I have every peripheral unplugged in the box. No FDD, no optical drives--the PS is running the two HDDs, the system board, a generic RealTek-based PCI 10/100 NIC and the fan for the drives. That's it. The image shown here is an earlier shot, changes have been made:
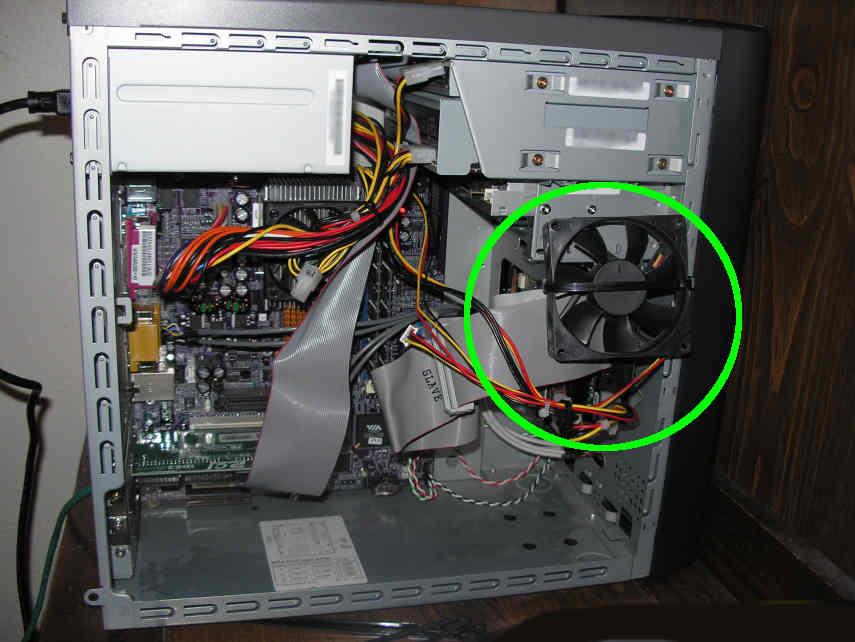
- I have moved the front drive's IDE cable out of the way so more air gets through the gap between the drives.
- The PS is replaced, with no power going to any devices other then as mentioned above.
- The Promise Ultra100 TX2 IDE controller has been removed (a very useful card to have in your collction. I find it never stays in one place very long. Useful for your optical drive(s) when you are going to use all of the available onboard IDE interfaces for Linux software RAID or if I needed another HDD connection for RAID5--which is a possibility in the future).
Based on my experiences with Ubuntu as a desktop platform I decided I would go with an installation of Ubuntu 5.10 Sever, or as they say, Ubuntu "optimised for server installation." I am not exactly sure what that means, aside from the fact that it installs a very minimal set of applications. Very minimal. You need to have some knowledge of running things from the command line or you will not get very far I believe. That's OK though, a minimal base is generally what you want to use to build a reliable/secure server system. If you have ever done an Ubuntu install previously, you know it's accomplished via a text based interface. No frills but simple & easy enough to navigate (I actually prefer it in some cases to the oft-times bloated GUI installs of other distros). The only daunting part you may come up against if you are new to this sort of thing is partitioning. However if you are familiar with the filesystems used in Linux it should not really be an issue. I don't recall any options for choosing packages during the initial install, perhaps because all you really are getting at first is the base system & tools. Choosing apps was done afterwards via the CLI command, apt-get. No problems there. I love APT!
Initially I started with the following layout: one 120GB Maxtor 6Y120L0 [115GB] HDD with 7.4GB for the root filesystem (ReiserFS--a robust journaling filesystem), 2GB swap partition, and the remaining disk space for the /data partition (also ReiserFS). If I was really going to store "important" data on this thing I quickly determined that redundancy was in order. If I had two more larger capacity drives available, I would have left the Promise IDE card in the box and set up a RAID5 array [Striped w/parity]. Alas, I only had one additional drive to use for the project (the original drive from the eMachine, an 80GB Samsung SV8004H [75GB]). It would have to be RAID1 (Mirrored) for today. I added the Samsung drive and restructured the partitions as follows:
Maxtor 120GB (hda)I have manually built Linux software RAID arrays previously, but these days there is no need to do this (thankfully!). You could set it up initially during the installation or run base-config afterwards. Even easier, use apt-get to install Webmin (along with Samba, SWAT, SSH) and use the Partitions on Local Disks & Linux RAID modules under the Hardware tab to configure it. The following are packages I installed (you won't want the first one if you are not using a 32-bit AMD processor):
hda1 / 7.4GB ReiserFS
hda2 ext'd (remaining drive space)
hda5 swap 2GB
hda6 /dev/md0 75GB
hda7 /data2 31GB ReiserFS
Samsung 80GB (hdc)
hdc1 /dev/md0 75GB
RAID1 Array
md0 /data1 75GB ReiserFS
apt-get install linux-image-k7 linux-restricted-modules-k7
apt-get install samba
apt-get install webmin-core
apt-get install webmin-samba
apt-get install webmin-software
apt-get install webmin-smart-status
apt-get install webmin-cpan
apt-get install lvm-common
apt-get install ssh
apt-get install swat
apt-get install sensord
apt-get install mondo
Of course all of these packages do not apply to working with partitions and RAID arrays but several of them are useful.
- linux-image-k7 linux-restricted-modules-k7 are specific for my CPU
- Samba is the (ubiquitous) fileserver that I am using
- ssh provides Secure Shell services (I have no monitor, keyboard, mouse or other input peripheral attached to this box--I do it all through webmin and SSH CLI)
- lvm-common is needed for the RAID module
- SWAT is a web-browser based tool for configuring Samba (I don't have it working yet, it is not responding to http://fileservername:901 as it should. I actually like it better then working through the Webmin Samba module. Either that or edit it by hand. nano is your friend.)
- sensord provides hardware monitoring capabilities
- mondo provides the Mondorescue backup functionality, very powerful, easy to use
- For information on configuring automated backups with Mondoresecue, see Section 5 of HOWTO run mondo interactively using cron. Basically you create a script that runs your backup using the screen command. It works!
- webmin-modulename provides the various webmin modules that I required
- Note: I used the Upgrade Webmin module in Webmin to upgrade to the latest/greatest version from the official site. Whether or not this is something you wish to do, well that is totally up to you of course--I have seen no adverse effects from upgrading the Ubuntu server in this manner thus far.
- Open Webmin in your favorite browser (i.e. https://myserver:10000)
- Select the Webmin Tab
- Click Webmin Configuration
- Click Upgrade Webmin
- Select the Latest version from www.webmin.com radio button
- Select the Check GnuPG signature on package? check button
- Click the Upgrade Webmin button
# deb cdrom:[Ubuntu-Server 5.10 _Breezy Badger_ - Release i386 (20051013)]/ breezy main restricted

deb http://us.archive.ubuntu.com/ubuntu breezy main restricted
deb-src http://us.archive.ubuntu.com/ubuntu breezy main restricted

deb http://us.archive.ubuntu.com/ubuntu breezy-updates main restricted
deb-src http://us.archive.ubuntu.com/ubuntu breezy-updates main restricted

## The Universe repository is ENTIRELY UNSUPPORTED by the Ubuntu
## team, and may not be under a free licence.
deb http://us.archive.ubuntu.com/ubuntu breezy universe
deb-src http://us.archive.ubuntu.com/ubuntu breezy universe

deb http://security.ubuntu.com/ubuntu breezy-security main restricted
deb-src http://security.ubuntu.com/ubuntu breezy-security main restricted

deb http://security.ubuntu.com/ubuntu breezy-security universe
deb-src http://security.ubuntu.com/ubuntu breezy-security universe
Between SSH command line admin and Webmin configuring Ubuntu 5.10 Server was, well, Breezy! With basically throw-away hardware I have built a central repository for my family's data that combines a stable, proven operating system, hardware failure redundancy with a robust journaling filesystem and a powerful backup solution (via Mondorescue which I can easily script to run from cron). The Samba configuration is quite basic1 at the moment but I plan on implementing a more complex model for better permissions controls so my kids don't accidently delete my data and vice-versa. I have plenty of experience in this area so I suspect I will end up with a Samba PDC before too many days pass...
All in all, aside from the HDD heat problem I initially encountered building out the Ubuntu 5.10 server has proved to be incredibly simple. Configuration and adminstration are a snap. Command line familiarity is helpful, but for the GUI inclined Webmin provides excellent support tools. And, the Ubuntu APT repositories provide you with virtually limitless opportunities to apply whatever applications to your server that you might want or need.
Resources for Ubuntu:
Resources for Samba:
- The Official Samba-3 HOWTO and Reference Guide PDF HTML
- Samba-3 by Example PDF HTML
- Using Samba, 2nd Edition
- SAMBA (Domain Controller) Server For Small Workgroups With Ubuntu 5.10 Found this one today [08-Jan-06]. Looks very good.
1Simple smb.conf example:
#
# Sample configuration file for the Samba suite for Debian GNU/Linux.
#
#=============== Global Settings ===============

[global]
 log file = /var/log/samba/log.%m
 passwd chat = *Enter\snew\sUNIX\spassword:* %n\n *Retype\snew\sUNIX\spassword:* %n\n .
 obey pam restrictions = yes
 socket options = TCP_NODELAY
 encrypt passwords = true
 passwd program = /usr/bin/passwd %u
 passdb backend = tdbsam guest
 dns proxy = no
 netbios name = MARSHALL
 server string = %h server (Samba, Ubuntu)
 invalid users = root
 workgroup = WORKGROUP
 os level = 20
 syslog = 0
 security = share
 panic action = /usr/share/samba/panic-action %d
 max log size = 1000

[homes]
 create mask = 0775
 comment = Home Directories
 directory mask = 0775
 browseable = no
 writeable = yes
 only user = yes

[share]
 comment = RAID1 Share
 writeable = yes
 public = yes
 user = username
 path = /data1/share

[zeta]
 comment = Non-RAID Share
 writeable = yes
 public = yes
 user = username
 path = /data2/zeta
Tags: ubuntu server Mondorescue Samba Computer Hardware Linux Software RAID
Updated 21 December 2005: Added step-by-step Webmin upgrade instructions.
Updated 22 December 2005: Added sample Samba config info.
Updated 27 December 2005: Added links on scheduling Mondorescue backup jobs via cron.
Updated 08 January 2006: Added link to a howtoforge article to Samba Resources.
No comments:
Post a Comment